Adding Cabinets To Ceiling / Add 2×2 boards to top of cabinets and ceiling.
byAdmin-
0
Adding Cabinets To Ceiling / Add 2×2 boards to top of cabinets and ceiling.. Slide the upper cabinet up until it is tight against the ceiling. Therefore, it is difficult to install a wall cabinet to the ceiling. Repeat the above process 24 inches out from the wall as well, running the straight edge or level parallel to the wall where the front of the cabinets will sit. I promised a few weeks back while installing laundry room cabinets that i would show you how we added crown molding to the top. Once the structure is extended, we reface the cabinets in order to hide any seams and structural changes so they are essentially brand new, taller cabinets with new doors.
You can build the cabinets to the ceiling (most expensive option), keep the area open (no cost!), build a soffit to match the cabinets, or add a drywall soffit. Then, measure the length of the cabinets. I avoided cabinets to the ceiling in all rooms to keep my cost down! You can build the cabinets to the ceiling (most expensive option), keep the area open (no cost!), build a soffit to match the cabinets, or add a drywall soffit. Measure the length and height of the space above the cabinets.
Extending Kitchen Cabinets Up To The Ceiling Reality Daydream Extending Kitchen Cabinets Cabinets To Ceiling Kitchen Cabinets To Ceiling from i.pinimg.com Standard builder cabinets same ugly bulkhead and i also was thinking of adding small cabinets on top of the existing cabinets to bring all the way to ceiling. The difference vary's from nothing to 3/8. Building these cabinets to the ceiling was one of the best decisions we've had! So here's the thing, i didn't use any fancy tools to build these boxes. For the final finishing touch add your molding to the top of the cabinets. Hanging upper wall cabinets from a ceiling or soffit. Below i'll share photo examples (and the why behind) how i filled the space above cabinets in my own home. It took me an eternity to find the right wall color, but i think i've found it!
Remember, if you are adding crown molding, you need to leave room for that, or use wider width rails when building the face frames.
Measure the length and height of the space above the cabinets. I still would have done this project even with the taller cabinets. Place a mark on the floor to indicate the high end. Add on to existing upper cabinets if ceilings are eight feet high, we can extend the structure of your existing cabinets rather than building them completely new. So here's the thing, i didn't use any fancy tools to build these boxes. Tip the poplar props up underneath the cabinet; The laundry room remodel is moving along slowly but surely. Remember, if you are adding crown molding, you need to leave room for that, or use wider width rails when building the face frames. Once these screws are in place, the cabinet is capable of supporting its weight. Learn how easy it is to update your kitchen! Here are the key things to consider when deciding whether or not installing floor to. Below i'll share photo examples (and the why behind) how i filled the space above cabinets in my own home. Once you decide how far up the wall you want to move your cabinets, use the level to mark off the new height on the wall.
For the final finishing touch add your molding to the top of the cabinets. Crown molding of your choice 6. Tip the poplar props up underneath the cabinet; Use a tape measure and check the distance between the top of the cabinets and the ceiling. I still would have done this project even with the taller cabinets.
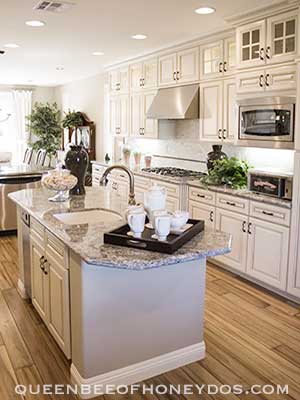
How To Install Stacked Cabinets Over Builder S Grade Queen Bee Of Honey Dos from www.queenbeeofhoneydos.com If you're planning on installing the trim yourself as a diy project, keep this important tip. Place a mark on the floor to indicate the high end. Molding is an easy way to make cabinets look expensive and upscale. I love the look of built ins and building them up to the ceiling just feels more custom to me. Much like crown molding makes walls look more classy, crown molding does the same for cabinets. The laundry room remodel is moving along slowly but surely. Once you decide how far up the wall you want to move your cabinets, use the level to mark off the new height on the wall. Use a nail gun to nail through the boards into the cabinets and ceiling.
Drill a flat bracket or l bracket into each board and use it to connect to the top of the cabinets.
For the final finishing touch add your molding to the top of the cabinets. They really complete the look in the kitchen and the crown molding makes it look so polished. Use a nail gun to nail through the boards into the cabinets and ceiling. Repeat the above process 24 inches out from the wall as well, running the straight edge or level parallel to the wall where the front of the cabinets will sit. Much like crown molding makes walls look more classy, crown molding does the same for cabinets. Place 2×2 blocks along the top of the cabinets and ceiling where the drywall will attach. Once the structure is extended, we reface the cabinets in order to hide any seams and structural changes so they are essentially brand new, taller cabinets with new doors. This is when stacked cabinets look the best. We are building a new house and have just installed our upper cabinet boxes with a simple straight crown that goes to the ceiling. Crown molding of your choice 6. I love the look of built ins and building them up to the ceiling just feels more custom to me. You just take a thin sheet of plywood, cut it to size, and brad nail it to the bottom of the cabinets. Use a nail gun to nail through the boards into the cabinets and ceiling.
Compare the high point on the front of the cabinets with the back, along the wall. Remember, if you are adding crown molding, you need to leave room for that, or use wider width rails when building the face frames. Place screws this way every six inches. Use a nail gun to nail through the boards into the cabinets and ceiling. Then reprinting and glazing all to match.
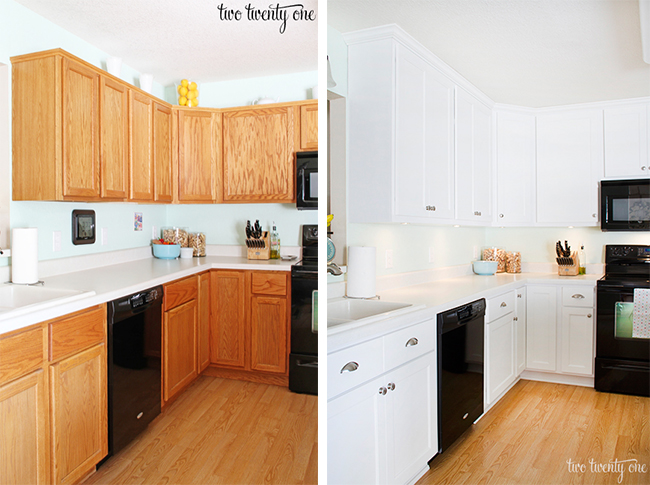
Kitchen Cabinet Refacing Makeover A Homeowner S Experience from www.twotwentyone.net I thought i'd show you how we extended the cabinets to the ceiling to elongate the room a little bit. You may not want to go all the way to the ceiling, since not all ceiling are level. Then paint and caulk and you are good to go. Repeat the above process 24 inches out from the wall as well, running the straight edge or level parallel to the wall where the front of the cabinets will sit. The difference vary's from nothing to 3/8. Standard builder cabinets same ugly bulkhead and i also was thinking of adding small cabinets on top of the existing cabinets to bring all the way to ceiling. Use whichever point is higher as your reference mark. Place screws this way every six inches.
Drill a flat bracket or l bracket into each board and use it to connect to the top of the cabinets.
You can build the cabinets to the ceiling (most expensive option), keep the area open (no cost!), build a soffit to match the cabinets, or add a drywall soffit. Run crown molding across the top and nail into the vertical boards. You can build the cabinets to the ceiling (most expensive option), keep the area open (no cost!), build a soffit to match the cabinets, or add a drywall soffit. Then paint and caulk and you are good to go. Use a nail gun to nail through the boards into the cabinets and ceiling. Add 2×2 boards to top of cabinets and ceiling. Then, measure the length of the cabinets. I avoided cabinets to the ceiling in all rooms to keep my cost down! Actually, more slowly than surely. We held a scrap piece of 1/4″ plywood in front of the 2×2 to line it up correctly when we clamped the 2×2 down. They really complete the look in the kitchen and the crown molding makes it look so polished. February 18, 2013 by chris. Here are the key things to consider when deciding whether or not installing floor to.